FREE DOMESTIC SHIPPING ON ORDERS $99+ | 100% SATISFACTION GUARANTEED
FREE DOMESTIC SHIPPING ON ORDERS $99+ | 100% SATISFACTION GUARANTEED
A column with no settings can be used as a spacer
Link to your collections, sales and even external links
Add up to five columns
A column with no settings can be used as a spacer
Link to your collections, sales and even external links
Add up to five columns
Add description, images, menus and links to your mega menu
A column with no settings can be used as a spacer
Link to your collections, sales and even external links
Add up to five columns
Add description, images, menus and links to your mega menu
A column with no settings can be used as a spacer
Link to your collections, sales and even external links
Add up to five columns
Add description, images, menus and links to your mega menu
A column with no settings can be used as a spacer
Link to your collections, sales and even external links
Add up to five columns
Add description, images, menus and links to your mega menu
A column with no settings can be used as a spacer
Link to your collections, sales and even external links
Add up to five columns
How to Tie a Square Knot Sash
October 11, 2017 3 min read

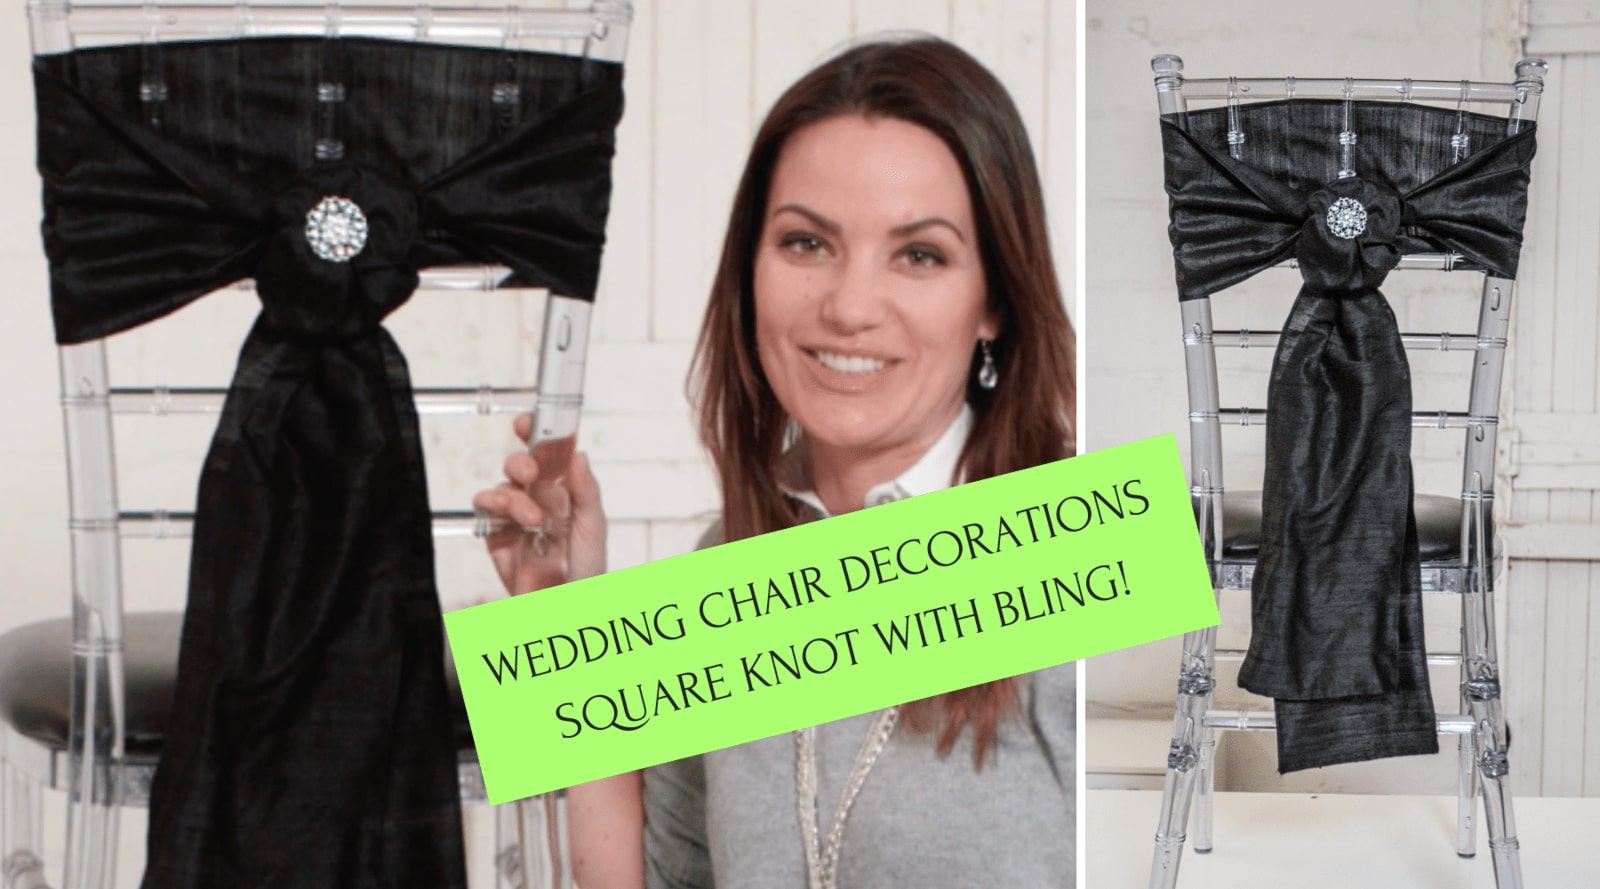
An elegant square knot with a beautiful bling brooch
Creating wedding chair decorations doesn’t have to break the bank or be too difficult to do. I’ve got another super easy tutorial for you that leave your chairs looking like a pro styled them and there’s no glue or sewing involved.
The secret to creating a beautiful and elegant chair sash design is in choosing the right tie method and the right combination of chair and sash material. Play around a little with the different options and see which one suits your needs the best. Here are some of our most recent chair sash tutorials, each one as lovely as the next:
- How to tie a vertical Chair Sash
- How to Tie a Flip Tie Chair Sash
- How to Tie A Diagonal Chair Bow
- How to Tie a Chair Sash Bow
- DIY Chair Sash Tying
- DIY Elegant Chair Sash
- DIY Tulle Flower Chair Bow
Watch the tutorial
In order to make these DIY square knot sashes you'll need:
- A sash - I’ve used a dupioni silk sash in black but any sash will do, depending on the style of your wedding or event theme. A satin sash looks equally glamorous for the budget chair decoration.
- A chair, of course
- Your choice of bling. For this sash, I’ve used a medium-sized brooch, the silver ornate flower brooch
Creating this beautiful square knot is much easier than the end product makes it look. Start by folding your sash in half to find the middle point. Arrange the sash around the chair, if you’re using a chair with a backing like the chivari chair I’ve used in this tutorial, then it’s a great idea to weave the sash through the bars of the chair in order to keep the sash from slipping down.
Once you’ve weaved your sash through the chair, tie a basic knot to keep the sash in place. Align the top and bottom pieces and take both pieces and pull it around the back of the knot. Doing this will create a loop at the bottom of the knot through which you can tuck the tails. Even it out and arrange it so that the knot looks neat and tidy.
I’ve added a medium-sized brooch so as to not detract from the knot itself as it looks absolutely gorgeous as is. You can play around with the bling you’d like to use for this knot.
Making use of the brooch makes adding bling a whole lot easier and is great for repurposing pieces after the wedding or event is done.
A few quick ideas
One of my favorite ways to spruce any chair design up is to add bling but you can certainly add other elements to the square knot along with the bling too. A feather, a special floral element, a gorgeous bow. Anything that will suit your event’s theme.
A great way to add a new dimension to your sash is to combine more than one bling piece. We’ve recently seen clients pairing rhinestone pieces and it looks absolutely amazing.
As always, have fun playing around with your wedding or event styling. Our tutorials aim to show you easy and cost-effective ways of creating gorgeous details that won’t take up all of your time.


