FREE DOMESTIC SHIPPING ON ORDERS $99+ | 100% SATISFACTION GUARANTEED
FREE DOMESTIC SHIPPING ON ORDERS $99+ | 100% SATISFACTION GUARANTEED
A column with no settings can be used as a spacer
Link to your collections, sales and even external links
Add up to five columns
A column with no settings can be used as a spacer
Link to your collections, sales and even external links
Add up to five columns
Add description, images, menus and links to your mega menu
A column with no settings can be used as a spacer
Link to your collections, sales and even external links
Add up to five columns
Add description, images, menus and links to your mega menu
A column with no settings can be used as a spacer
Link to your collections, sales and even external links
Add up to five columns
Add description, images, menus and links to your mega menu
A column with no settings can be used as a spacer
Link to your collections, sales and even external links
Add up to five columns
Add description, images, menus and links to your mega menu
A column with no settings can be used as a spacer
Link to your collections, sales and even external links
Add up to five columns
Living Luxuriously For Less Glam Brooch Bouquet
January 29, 2018 3 min read

A gorgeous glamor brooch bouquet inspired by the perfect wedding of Keyshia Ka'oir and Gucci
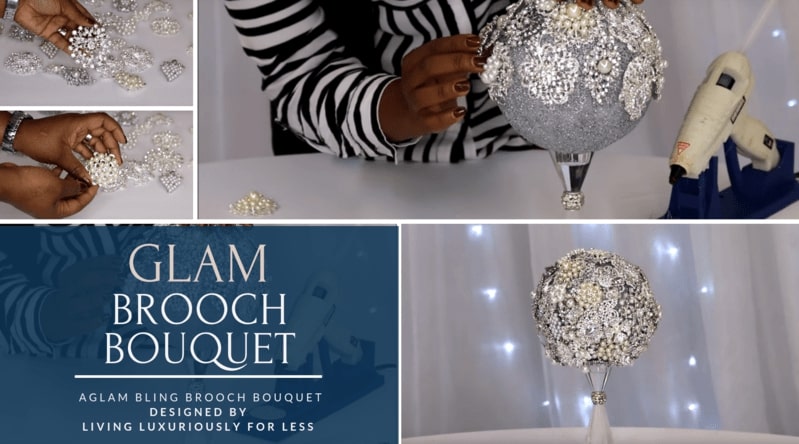
Melanie Turner from Living Luxuriously for Less has treated us to a stunning glam bling brooch bouquet tutorial and I have the pleasure of sharing it with you all today.
This gorgeous brooch bouquet has a slight twist on the usual bouquets that we've seen and is all sparkle and shine with a crystal handle included. A stunning touch and such a practical way to add that extra star quality to the bouquet. Inspired by the Keyshia Ka'oir and Gucci wedding, Melanie took her brooch bouquet to the next level!

Using all silver and pearl brooches from our Totally Dazzled rhinestone brooch collection, Melanie created a stunner of a project and the tutorial explains how to go about making your very own sparkling wedding bouquet just like hers. I've always loved the silver and pearl or gold and pearl look as it adds a bit of timeless beauty and depth to the bouquet.
The bling brooch bouquets are a stunning variation of the traditional wedding bouquets and make lovely keepsakes. They look absolutely amazing in the hand of a bride, too, and are most definitely unique. There are so many ways to style your own brooch bouquet, and adding in handed down keepsakes and special items could be a great way to create a sentimental piece that holds a little bit of everyone special in it.
Take a look at the sparkling glam bling brooch bouquet
Melanie used the following products to make her bouquet:
- A selection of silver and pearl bling - (you could use gold too!)
- Crystal candle holder
- Metallic Paint A styrofoam Ball
- a foam paintbrush
- wire clippers floral pegs (to fill in any small gaps and add the final touches)
- e6000 glue
- Glue gun and glue sticks
As Melanie mentions, it's a good idea to clip off the backing of the brooches as they can be a bit heavy. This just helps to alleviate some of the weight of the finished bouquet and ensure that it's not top heavy. It also helps to keep the pieces properly in place as there is more area behind the brooch to add the glue to.
Melanie has painted her ball with a silver metallic paint to ensure that the white of the styrofoam doesn't filter through the rhinestone brooches. Doing this gives your project a lovely finished look at the end of the day.

It's a great idea to start with the bigger pieces and from the top down, filling in with smaller pieces as the project grows.


I absolutely love seeing each crafter's version of the brooch bouquet. Reina Moe also recently created a gorgeous bling bouquet in which she used flowers combined with bling. And if you'd really like to get creative, you could add anything you wanted to in order to create your own unique brooch bouquet that also fits in with your wedding's theme. Go wild
Get in Touch with Living Luxuriously For Less
If you'd like to get in touch with Melanie Turner from Living Luxuriously For Less, you can do so by checking out her Social Media channels. She is on Facebook, Google Plus, Instagram, has a blog you can follow, and also has a dedicated YouTube channel where she shares beautiful DIY projects.


